Birds are a part of our natural environment. Their beauty provides a sense of peace and serenity to those who watch them. They can be found in all parts of the world and can be found in many different colors, shapes, and sizes.
Drawing a bird is all about capturing the essence of the bird’s nature. The feathers, the eyes, the legs, and the beak are the most noticeable features of any bird and finding which one defines the bird’s nature is what will make your drawing come to life. It doesn’t matter if you are drawing a hummingbird or an ostrich. It’s all about capturing the essence of what makes that particular bird beautiful.
From basic shapes to lines to realistic shading, in this tutorial, we are going to learn how to draw and shade a bird step by step.
How to draw a bird
You can draw any kind of garden bird by following this tutorial! To draw a particular type of garden bird, look at photos of birds and adjust the early geometric shapes’ proportions as needed. Then, keep drawing by following the tutorial as you add more detail.
For instance, since long-tailed tits naturally have longer tails, step three requires you to remove the tail at an angle of two times its length. Additionally, because of their rounder bodies and smaller heads, make the ovals in steps 1 and 2 more rounded. Clever, eh!.
Let’s do another one. Step 2: Make the head oval, flatter, and more squat to the body because wrens have flatter heads. Since wrens have tails that stick up in the air, draw your tail lines (step 3) so that they stick up at an angle of about 45 degrees rather than angling the tail down towards the ground. Ready to draw a bird?.
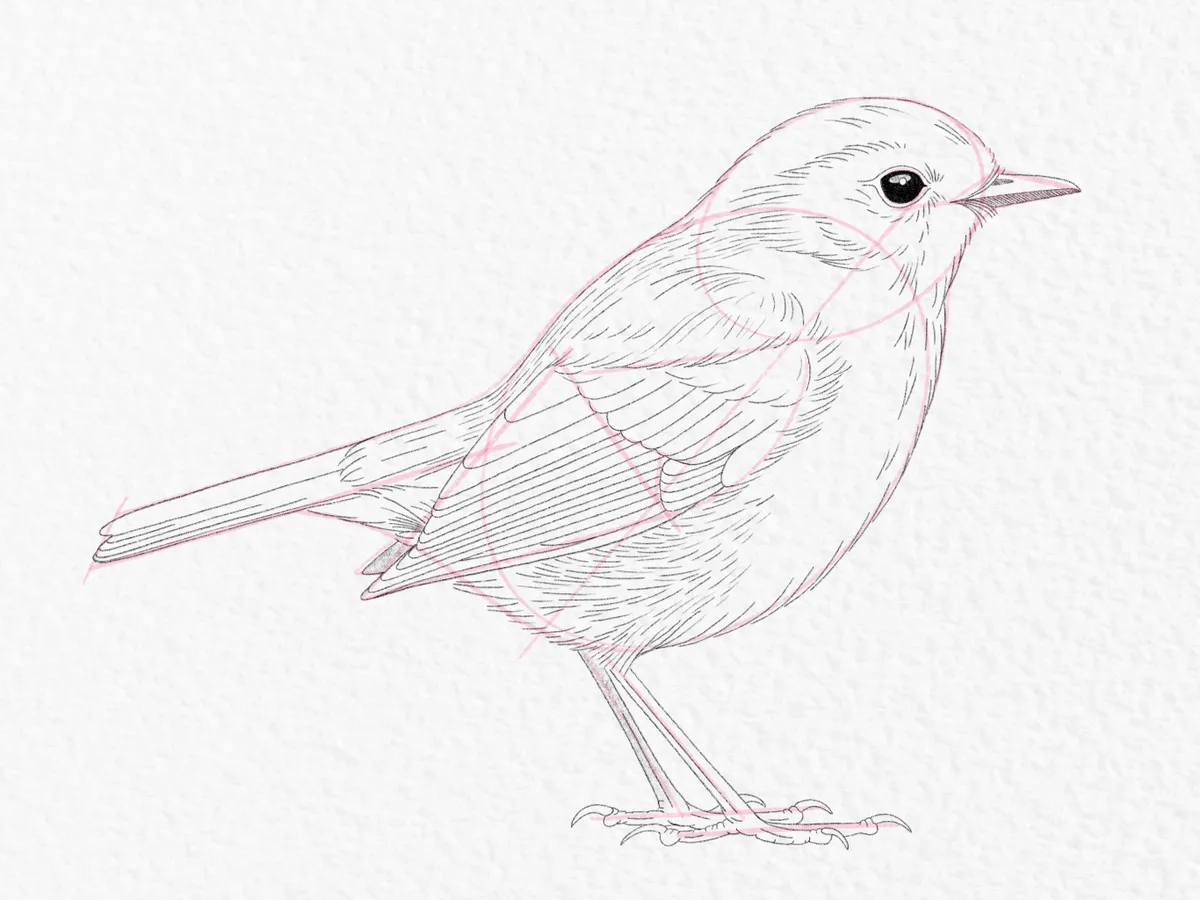
In order to make the construction lines in this bird drawing tutorial obvious, we used red; however, when we added the detail on top, we lightened the lines.
Top tips for drawing birds
- When sketching from life, simplify complex scenes (such as those with lots of branches or fluffed feathers) by using basic shapes and patterns.
- It’s not always necessary to depict every feather or line on the bird; sometimes, just a suggestion will do to convey the spirit of the species.
- You can quickly cover a large area by filling in the feathers with patterns of pencil strokes, like we’ve done here.
- Start a (secret) messy sketchbook. Don’t feel obligated to show it to anyone, and quickly sketch wild birds for 30 seconds at a time. With practice, you’ll find that drawing birds comes more quickly and easily when you focus on shape and form. Additionally, you’ll be able to turn through it to view your development!
- The shape is the most important aspect when drawing birds. Even without any details, the bird will appear realistic if your shape is precise.
- Before adding any markings to your bird, lightly outline the relevant feather groups. These groups will assist you in correctly determining the proportions of the markings and in giving the body, face, tail, and wings structure.
- Include a center line in the middle of the breast when drawing the bird’s body. This will assist you in keeping your drawing of the breast feathers symmetrical.
- When sketching the tail, fan the feathers on either side after they overlap to place the middle feather on top. So, use this formula when drawing the birds tail.
- When drawing from life (or photos), as Neil Buchanan advises, capture what you actually see, not just what you believe you see!
Remember to tag us in your artwork on Instagram, Facebook, and Twitter as well! We adore seeing what you create!
Step 5: Draw a circle
We are going to draw a small circle for the bird’s eye now that we are seated between the guidelines of the two heads.
FAQ
How do you draw a new bird?