Begin drawing the guidelines for the bird starting with the shapes for the head and body. Add the wing guidelines and then draw in the limb lines for the legs and tail. Begin drawing the guidelines for the bird starting with the shapes for the head and body. Add the wing guidelines and then draw in the limb lines for the legs and tail.
For this next step you will draw the shape of the phoenixs diamond shaped head and then draw in the eyes, marking line for the beak, and then a tuft of hair on the head. For this next step you will draw the shape of the phoenixs diamond shaped head and then draw in the eyes, marking line for the beak, and then a tuft of hair on the head.
Up next, draw the wings in a curled up style. The two feather tips should be thick and hook like. Add detailing to the edges of the wings and then draw in the shape and structure of the phoenixs body. Up next, draw the wings in a curled up style. The two feather tips should be thick and hook like. Add detailing to the edges of the wings and then draw in the shape and structure of the phoenixs body.
We will focus on the left wing and draw in the rest of the feather tips which should be drawn in the same style and pattern as you did the first two. Add detailing to the wings and then draw the layers of feathers flowing through the inside of the wing. We will focus on the left wing and draw in the rest of the feather tips which should be drawn in the same style and pattern as you did the first two. Add detailing to the wings and then draw the layers of feathers flowing through the inside of the wing.
Repeat the same task to the right phoenix wing as you tackled on the left. Dont forget the detailing to the wings and then when youre happy, you can proceed to step six. Repeat the same task to the right phoenix wing as you tackled on the left. Dont forget the detailing to the wings and then when youre happy, you can proceed to step six.
You will work on drawing the legs and talons like so, then draw the phoenixs fanned out tail feathers and when youre done move to step seven. You will work on drawing the legs and talons like so, then draw the phoenixs fanned out tail feathers and when youre done move to step seven.
Lastly, if you like draw the diamond shape on the phoenixs chest and erase your mistakes and guides. Lastly, if you like draw the diamond shape on the phoenixs chest and erase your mistakes and guides.
Here is the line art when youre done. you can color in your beautiful phoenix and show folks what bird you have just created. Here is the line art when youre done. you can color in your beautiful phoenix and show folks what bird you have just created.
Description: Hello everyone and welcome back to another fun filled lesson here on Dragaort.com. Today I thought I would upload something spectacular and show you folks once again how to draw a phoenix, step by step. Out of all the fantasy creatures ever talked about, the phoenix is by far my favorite of all time. I was looking at all the phoenix drawings I made over time and there was one in particular that stood out to me that I really wanted to recreate again. It was the one that had the fiery wings, blue chest diamond and frost blue legs. I had soooo much fun with creating this bird of rebirth and I think it really does show. I dont want to speak too much because I do want you guys to enjoy this tut. I will be back with more exciting lessons so stick around. Tags
Step 4 – Now draw a tail for your phoenix
The phoenix is easily recognized due to its long, flowing tail. We will now add one to your phoenix drawing because without it, this wouldn’t be a comprehensive guide.
The underside of the right-hand wing will be connected to the back of the tail, while the bottom of the chest will be connected to the front of the tail.
This tail will have long, sharp feathers at the end that extend in various directions, just like the wings.
After finishing the outline of the tail, add more feather detail by drawing some lines inside the wing.
Phoenix Drawing in just 7 Easy Steps!
Among the most magnificent of all the mythological animals is the phoenix. It is said that these magnificent, fabled birds emerge blazing from the ashes.
Because of this feature, they are now widely used as a metaphor for comebacks in a variety of fields, and many people are curious about how to draw a phoenix.
Continue reading to find out how it’s done, as we have a guide that emerges from the ashes to assist you in this endeavor!
Our step-by-step guide on how to draw a phoenix in 7 steps will have you drawing one of these mythological birds in no time.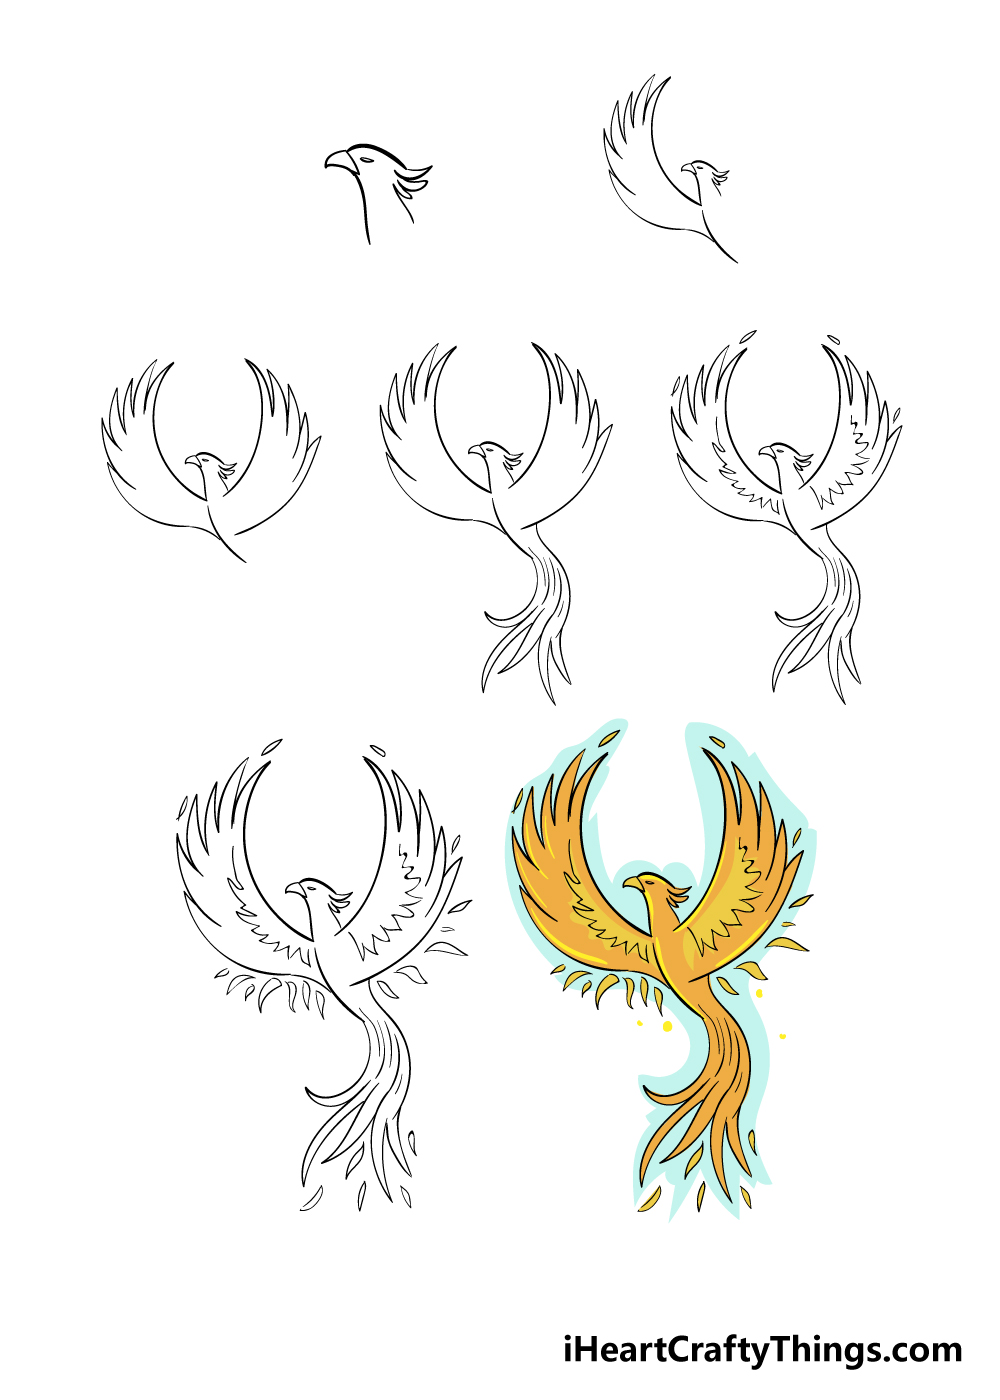
Step 5 – Draw some details onto your phoenix drawing
In this section of our phoenix drawing tutorial, we’ll be adding some details to the wings and surrounding area.
You can accomplish this by drawing a few rows of jagged, sharp lines along the wing’s inner edge. This will help to provide some extra fiery wing detail.
After you’ve added those details, you can also add some tiny, pointed shapes to the tips of the wings. These are some of the fiery details we will be completing in the last few steps.