by Joel Eade 1. What is a setup? A setup is using food, water, sound or other attractants to cause birds to perch or fly within close range of your camera for the purpose of creating detailed natural looking s. Of course I didnt invent the idea and there is much about this on the internet and in books. I have been reading and working at this for about 5 years and this article is sort of a list of suggestions, ideas and techniques that I have learned and used to successfully create pleasing s. If you are already into digital photography you can get into back yard setups easily and inexpensively. Along with some very basic equipment all you need is the desire to learn and experiment plus some persistence. Its a fun way to create great bird s at home. 2. What do I need to get started? You need some basic items to attract birds to your setup. This typically means bird feeders. There are a myriad of feeders available but I recommend simplicity and low cost. I use a few suet cages and a platform feeder fixed to an old 4X4 post about 4 feet tall and held up by a cheap plastic Xmas tree holder. A water feature such as a bird bath is helpful as well. A small fountain to make the water gurgle attracts a lot of species especially in winter if local water sources are frozen. The food you choose should be based on what bird species are in your area and what their preferences might be. Search the internet if you do not know this information. I use Sunflower seed, Safflower Seed, Thistle seed, Corn and suet cakes (usually peanut flavored). You can also use fruit and jelly which is good to attract Orioles. Mealworms are a popular attractant for Blue Birds and other species but they are expensive.
You also have to have a supply of natural looking perches. This can be just about any old twig, branch, weed stem, flower etc etc . I try to keep the perch proportional to the bird that I am trying to attract. Small birds look better on delicate perches and the woodpeckers look better on a thicker trunk-like perch. The idea is to make it look natural. Your perches have to be placed close to the food. The birds will naturally use them as they go back and forth to feed. You must also try to predict how the bird will sit on the perch so you can orient it appropriately to get the best . I think the s look best with a side view of the bird with it angled slightly toward the camera. If the perch you are using has some leaves or small twigs extending from it you can remove a few of those creating a small empty space and birds will usually land there. Using imagination and creativity in selecting and positioning the perches will pay off with more unique s. You will need to rig a mechanism to hold your perch in place, anything goes here. I use Xmas tree holders, an old tripod or light stand, wire ties, string, tape, clamps, whatever you can find. It just needs to be adjustable so you can control the height and angle of your perches. They dont need to be too tall, just about eye level when you are seated in the blind.
A blind is also an integral part of this process. You can shoot from your house through an open window but this doesnt let you change position and its hard to get good light on the subject. I use a pop up blind made for deer hunting called the Doghouse blind by Ameristep. There are many varieties of these available for less than $100. I fashioned a 5 foot square frame of 1 inch PVC pipe and attached the base of the blind to the frame with wire ties. This anchors the blind yet it is still very easy to move it around the yard. Remember you want to keep the sun behind you so moving the blind is helpful. You want a blind that has some way to adjust the window size so you can snug it closely around your lens as possible. This prevents birds from seeing movement inside. Birds tend to spook more from sudden fast movement than sound in my experience. Youll want some type of chair inside the blind, an old lawn chair works well.
A DSLR camera is best for this type of photography and you will need a telephoto lens. I would recommend a focal length of at least 300 to 400mm to allow you to be back away from the perch 15 to 20 feet or so but still allow you nearly fill the frame with your subject and be able to get good detail. I believe the lens is more important than camera body in producing great bird s. If possible dont skimp here, get the best lens you can afford. I absolutely love my Canon 300mm f/2.8L IS USM lens for this purpose. I frequently add the Canon 1.4 Teleconverter as well for a total focal length of 420mm. A tripod is essential as well. A gimbal type head is not mandatory but is very helpful to allow you to easily aim the camera. Again I would not skimp too much on the tripod, get the best one you can afford, I believe it makes a difference in sharpness. Keep in mind your subjects are small, they move constantly, you are magnifying those moves with a telephoto lens so you really want a solid foundation to shoot from. I use a Gitzo carbon fiber tripod and Wimberly II gimbal head. External flash is also a consideration. If you are in a relatively open area with good light you can make great s without flash but there are many times when it really helps to have just some fill flash to eliminate shadows, enhance color and contrast as well as give a little extra light so you can increase shutter speed. You will want one that has high speed sync and is manually adjustable as well one with a high guide number (ie a powerful output). There is a flash extender called the Better Beamer that I would highly recommend as well. It is a fresnel lens that focuses the flash farther away from your camera than usual. That way you can get fill flash on your subject at a distance and since the light is focused your flash uses less output and the batteries last longer. I use the Canon 580 EXII and the Better Beamer. Audio can also be used to attract birds. You can purchase recordings of bird songs for an IPod or similar device. Small, battery powered external speakers can be used for playback to attract birds. This is not a necessity but is an option that works in many areas and can be helpful if you are traveling for photographing birds and dont have the availability of a setup. 3. How do I get started? First start feeding the birds regularly and dont stop. It will take some time for your local birds to find the food and develop a habit of visiting regularly. If you always have food available you will get more and more activity over time. Take some time to think about where to put the feeders, consider that you will be placing a perch close to the feeder and you will place your blind within 15 feet or so and you want the sun at your back. Also consider the background of your s. Background elements should be as plain as possible and as far back as possible so they will be out of focus. Avoid back lighting or reflections of light in the background. You will need to collect a variety of sticks, twigs, limbs etc .. to use for perches. I like to change them frequently so all my s dont look them same. Place a perch near your feeder, it can be an old tree branch in an old flower pot, just make it simple and it should look natural. If you leave it there very soon birds will start using it as they come and go. Make it about 4-5 feet tall at most. Also consider the shape, configuration and orientation of the perch in relation to the camera and the background. Dont give the birds too many options of where to land otherwise you will have difficulty keeping your camera aimed at them. You need to be able to predict where they will land and how they will be positioned. If the perch has numerous forks or branches you will miss a lot of shots. Keep it simple. If the branch has leaves or blossoms you can remove a few in just a small section and birds will naturally perch in that open space. If you are trying for bigger birds (like Jays or Woodpeckers) you can use a thicker perch and drill some holes in it to fill with suet or seeds, just keep these out of sight in your . Place your blind about 15 to 20 feet from the perch (close to the minimum focus distance of your lens) and leave it up as much as possible so it is part of the landscape and birds will be accustomed to it. Consider sun angle and background. 4. How do I take s? Set your tripod and camera at a comfortable height so you do not have strain to look through the viewfinder. I will assume you know how to operate a DSLR and make basic adjustments to exposure parameters. You will need to understand the basics of exposure. There are a couple of key elements for bird photography that will help you make better s: You need as much shutter speed as possible and underexposure is “death” to a digital . So you have to adjust the exposure accordingly. The birds that will come are generally small and they are constantly moving, you are using a telephoto lens that has significant magnifying power so without a really fast shutter speed you will rarely get a sharp . I am talking at least 1/500 sec or faster to start with. Once you have honed your tripod and long lens technique you can go slower and get away with it occasionally. Do not be afraid to increase the ISO to prevent under exposure. An under exposed will be very noisy and detail will be poor. I frequently use ISO of 1000 to 1600 if I have to in order to keep the overall exposure correct and enable a faster shutter speed. Read and learn to use the histogram, find out what it means to push the exposure to the right without blowing out the highlights. The aperture controls depth of field and in most cases you want to be f/5.6 or higher, otherwise a good part of your bird will be out of focus. Point your camera at the perch, set the shutter speed at 1/500 sec, set the aperture at f/7.1, adjust the ISO so the meter reads zero on your camera. Now take a picture of the perch. Is it sharp and well exposed? Look at the histogram and make sure there is no data pushed against the left side (ie under exposed). If you need to, adjust the f-stop or ISO a little more to get the exposure right. I like to use the center autofocus point only on my camera for this type of shooting. I also like AI Servo mode so the camera stays focused on a moving object when I keep the shutter pressed halfway. Take a bunch of test s of the perch until you have the exposure adjusted. As the light changes you will have keep adjusting over time. If you do not like manual mode, it is certainly fine use aperture priority or shutter priority mode. I use manual mode and I find it easy to adjust on the fly. I try to expose for the bird and not the background. When a bird perches for you try to make sure the focus point is on the birds head or eye. The will look much better if the eye is sharp and well-focused. Also take into consideration the pose and head angle of the bird, its best if the head is parallel to the camera or angled slightly toward you. This will make the best . When you see what you like, start shooting, if possible take a lot of s – but I dont think the “machine gun” approach usually works too well. You will have some birds that are very skittish and some that will let you shoot all you want. Sometimes its best to let them come and go a few times before you start shooting so they arent permanently frightened away. I have found that birds will react more to motion than they do sound so avoid sudden fast moves as many times they can see that even inside the blind. Of course keep the opening in the blind as small as possible to just let the lens protrude. When theres a break in the action you can adjust exposure, review your s and consider if you need to move the perch or the blind slightly to improve the light or the background. Watch the sun angle and keep it mostly behind you. If your s arent sharp try increasing ISO or lowering the f-stop slightly so you use more shutter speed. Like maybe 1/1000 sec. or faster if possible. Take some more test shots of the perch and check the histogram. I have noticed birds are most active in the morning especially the first 2 hours after sunrise but there can periods of activity on and off all day. In colder weather birds feed more steadily. The best light is when the sun is low in the sky morning and evening. Very bright cloudless days when the sun is high in the sky are bad, the s have strong shadows and are usually too contrasty. Soft over cast days can produce nice s all day. An external flash and better beamer can really help on days like this. Use your imagination, change the perches frequently so all your s dont look the same. You can have more than one perch set up simultaneously. These are the techniques I have learned and taught myself. I really enjoy the challenge of trying to make the birds pose where I want them and challenge of using proper camera techniques to create sharp, well exposed s with pleasing backgrounds and with somewhat artistic composition. I know you can do the same. I am not a pro photographer and you may find many other opinions or techniques that are different from mine. Keep in mind I am self-taught and in photography there are no rules “set in stone”. If you start doing setups, you will learn your own techniques and develop your own style. I hope this information has been helpful as a starting point. Joel Eade
Deciding on the target species
It is beneficial to have some idea of the species you are likely to be able to attract into the garden before you try to get them to come. This will vary depending on your country of residence and the nearby habitats.
To cater to as many people as possible, I will concentrate on the garden birds that are most frequently seen in the UK in this post. You will need to modify the above strategies and investigate the needs of those species if you believe you can attract rare birds or birds from another country.
How to attract birds to your garden
To attract birds we must first understand what they need. The majority of the birds that we are likely to see in our gardens desire water to bathe in, and all of them require fresh water to drink.

They must eat, but the kinds of foods they need differ depending on the species (and even seasonally for some species).
For instance, a finch will mostly consume seed, especially during the winter, but when it comes to raising its young, the same birds will gather insects for sustenance.
In the summer, thrushes can be seen gathering worms and snails, but in the winter, they’re just as likely to be found munching on berries found in trees and shrubs.
In addition, birds require a place to build their nests as well as access to resources in the spring. They also require secure areas to roost in or simply retreat to in case of emergency.
Let’s take a closer look at each of these specifications and consider how we might use them to our advantage in order to photograph birds in the garden.
The first thing that came to mind when I thought of giving birds water was a garden pond. While having a garden pond is something I would strongly advise anyone interested in wildlife to do, it’s not always the greatest way to draw birds for photos.
Read more: How to Build a Bird Reflection Pool
I built my garden pond with the express purpose of taking pictures of birds in their baths, so I raised it so I could get eye-level views. I excavated the pond into a bank of earth at the back and used railroad sleepers at the front. This made sure the wildlife could have easy and safe access through the vegetation at the back, and I could have the views I wanted from the front.
Still, I consider the pond to be pretty restrictive for bird photography. I can only really see the pond from one side, and its edges are usually rather overgrown because that is best for other kinds of wildlife. Thus, while the pond is great for wildlife, photography opportunities are limited.

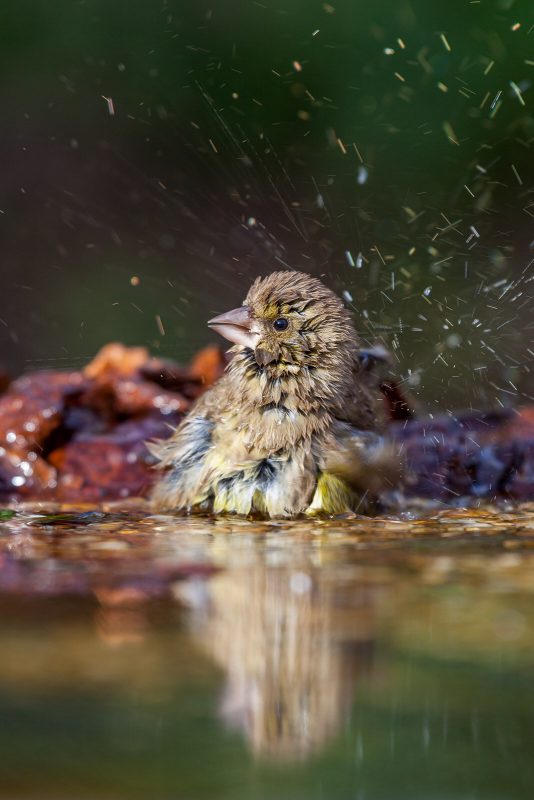
I’ve noticed that compared to the pond, I take a lot more pictures of birds drinking and bathing at bird baths. Bird baths are adaptable; they can be raised or lowered based on the camera’s perspective and moved to better fit the available light.
Though I’m not sure why, I also find it strange that I believe birds would rather drink and bathe in a bird bath than at the pond. Perhaps it is because the bird bath is conveniently located next to the bird feeders, or perhaps it is because the water is consistently the same depth and is changed on a regular basis.
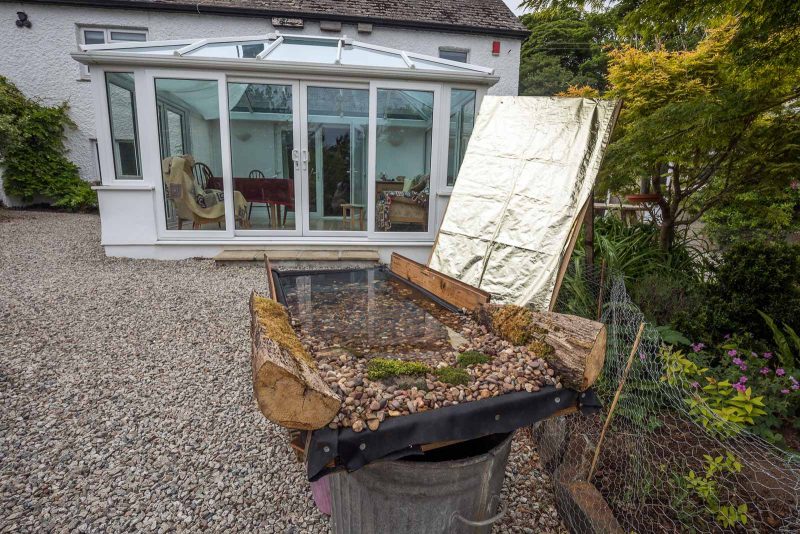
The standard pedestal-mounted bird bath can have a very lovely appearance. I have tried a number of different approaches, like using a wide-angle lens with a remote release or an eye-level telephoto lens. However, I usually aim to capture images that appear a little more natural, so I have a bird bath with a “infinity pool.” This is essentially just a large bird bath that can be naturally decorated with mossy branches, pebbles, or leaves.
In order to create an infinity pool, I need a plywood base that is at least 24 inches wide and at least 50 inches longideally longer due to the angle of view and my desire to avoid having the front edge show up in the pictures. I use pond liners to hold the water after screwing some 2-inch-tall wood around the edge. This can then be positioned somewhere convenient. Right now, my infinity pool is an eye-catching garden feature outside my conservatory, perched atop two overturned trash cans!
You’ll eventually come up with methods for improving the efficiency of this pool. To help the birds enter the water and to hide the far edge of the base, I’ve added flint shingle to the water at the far end of mine.
I’ve placed planks along the two sides to prevent birds from entering where they would appear out of place. Despite my best efforts, some birds still land at the near edge, which bothers me, but most of them learn to approach from the far end.
Putting out bird feeders is the easiest way to provide food for the birds, and it’s also the easiest way to take pictures because you can move the feeders around the garden to the best photographic spots and refill them on a regular basis. While taking pictures of birds on feeders can be enjoyable, it won’t always spark our creative juices.
Strategically placed bird feeders will allow us to take pictures of birds in flight. To achieve this, make your bird feeder’s access points as small as possiblejust one holeand put it in a location from which you could be able to estimate the bird’s flight path. When the bird flies in, use a remote release to take a quick series of pictures with your tripod-mounted camera. Bob’s your uncle.

You might prefer something more calm if you’re having trouble freezing the birds in flight, but bird photography is by no means calm.
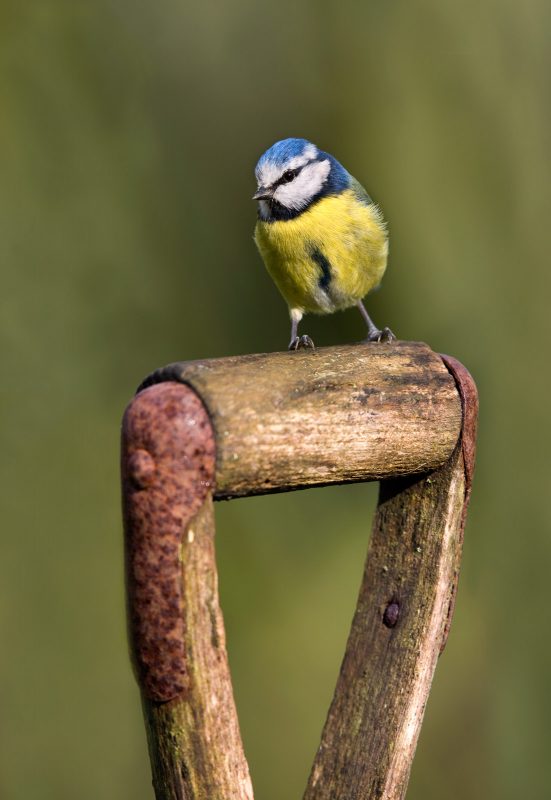
Put your feeder in a visible location near your home, then observe the birds’ approach. As the birds approach, place a natural prop in the way, and take pictures of them landing on it.
You can be as imaginative as you want with natural props. I have used lichen-covered branches and spade handles, but I have also used flower boughs.
Possibly from somewhere else in the garden, I might trim a little branch that has flowers on it. I then place the entire thing on the birds’ flight path close to the feeder after putting this into a tiny plastic bottle of water to keep it fresh for a day or two.

To draw birds to feeders, one can use bird seed, peanuts, niger seed, mealworms, and fat balls. However, they can also be positioned so that the feeder is hidden from view while still drawing birds.
Drilling holes in a log and inserting peanuts or fat will draw woodpeckers and tits. To attract goldfinches to your teasel heads, you can sprinkle niger seed inside of them. Logs with naturally occurring holes are available for storing bird seed. To encourage birds to perch on top, I have even drilled holes into fork handles (I promise not to bring up the sketch of “The Two Ronnies”!).
Once you have birds visiting a specific “set-up,” consider how you can modify it. For instance, I covered a log with fall foliage last fall when I had woodpeckers visit, and this spring, when I had young woodpeckers visit, I dressed the log by submerging foxgloves in buckets of water.
Additionally, you need to stock a variety of perches that look natural. This could be any old branch, twig, flower, weed stem, etc. I make an effort to maintain the perch in proportion to the bird I’m trying to draw. Woodpeckers appear better on a thicker perch resembling a trunk, while smaller birds look better on delicate perches. The idea is to make it look natural. Your perches have to be placed close to the food. They will be used by the birds instinctively as they fly back and forth to feed. Additionally, you need to try to anticipate the bird’s sitting position on the perch so you can orient it correctly to obtain the best The bird appears best, in my opinion, from a side view that is slightly inclined toward the camera. Birds will typically land in a small empty space created by removing a few of the leaves or small twigs that extend from the perch you are using. When choosing and arranging the perches, exercising imagination and creativity will yield more distinctive results. To keep your perch in place, you’ll need to rig something; anything goes in this situation. I use anything I can find, like wire ties, string, tape, clamps, old tripods or light stands, and Christmas tree holders. All you need is adjustment to regulate the height and angle of your perches. They should be about eye level when seated in the blind; they don’t need to be extremely tall.
A DSLR camera is best for this type of photography and you will need a telephoto lens. I would recommend a focal length of at least 300 to 400mm to allow you to be back away from the perch 15 to 20 feet or so but still allow you nearly fill the frame with your subject and be able to get good detail. I believe the lens is more important than camera body in producing great bird s. If possible dont skimp here, get the best lens you can afford. I absolutely love my Canon 300mm f/2.8L IS USM lens for this purpose. I frequently add the Canon 1.4 Teleconverter as well for a total focal length of 420mm. A tripod is essential as well. A gimbal type head is not mandatory but is very helpful to allow you to easily aim the camera. Again I would not skimp too much on the tripod, get the best one you can afford, I believe it makes a difference in sharpness. Keep in mind your subjects are small, they move constantly, you are magnifying those moves with a telephoto lens so you really want a solid foundation to shoot from. I use a Gitzo carbon fiber tripod and Wimberly II gimbal head. External flash is also a consideration. If you are in a relatively open area with good light you can make great s without flash but there are many times when it really helps to have just some fill flash to eliminate shadows, enhance color and contrast as well as give a little extra light so you can increase shutter speed. You will want one that has high speed sync and is manually adjustable as well one with a high guide number (ie a powerful output). There is a flash extender called the Better Beamer that I would highly recommend as well. It is a fresnel lens that focuses the flash farther away from your camera than usual. That way you can get fill flash on your subject at a distance and since the light is focused your flash uses less output and the batteries last longer. I use the Canon 580 EXII and the Better Beamer. Audio can also be used to attract birds. You can purchase recordings of bird songs for an IPod or similar device. Small, battery powered external speakers can be used for playback to attract birds. This is not a necessity but is an option that works in many areas and can be helpful if you are traveling for photographing birds and dont have the availability of a setup. 3. How do I get started? First start feeding the birds regularly and dont stop. It will take some time for your local birds to find the food and develop a habit of visiting regularly. If you always have food available you will get more and more activity over time. Take some time to think about where to put the feeders, consider that you will be placing a perch close to the feeder and you will place your blind within 15 feet or so and you want the sun at your back. Also consider the background of your s. Background elements should be as plain as possible and as far back as possible so they will be out of focus. Avoid back lighting or reflections of light in the background. You will need to collect a variety of sticks, twigs, limbs etc .. to use for perches. I like to change them frequently so all my s dont look them same. Place a perch near your feeder, it can be an old tree branch in an old flower pot, just make it simple and it should look natural. If you leave it there very soon birds will start using it as they come and go. Make it about 4-5 feet tall at most. Also consider the shape, configuration and orientation of the perch in relation to the camera and the background. Dont give the birds too many options of where to land otherwise you will have difficulty keeping your camera aimed at them. You need to be able to predict where they will land and how they will be positioned. If the perch has numerous forks or branches you will miss a lot of shots. Keep it simple. If the branch has leaves or blossoms you can remove a few in just a small section and birds will naturally perch in that open space. If you are trying for bigger birds (like Jays or Woodpeckers) you can use a thicker perch and drill some holes in it to fill with suet or seeds, just keep these out of sight in your . Place your blind about 15 to 20 feet from the perch (close to the minimum focus distance of your lens) and leave it up as much as possible so it is part of the landscape and birds will be accustomed to it. Consider sun angle and background. 4. How do I take s? Set your tripod and camera at a comfortable height so you do not have strain to look through the viewfinder. I will assume you know how to operate a DSLR and make basic adjustments to exposure parameters. You will need to understand the basics of exposure. There are a couple of key elements for bird photography that will help you make better s: You need as much shutter speed as possible and underexposure is “death” to a digital . So you have to adjust the exposure accordingly. The birds that will come are generally small and they are constantly moving, you are using a telephoto lens that has significant magnifying power so without a really fast shutter speed you will rarely get a sharp . I am talking at least 1/500 sec or faster to start with. Once you have honed your tripod and long lens technique you can go slower and get away with it occasionally. Do not be afraid to increase the ISO to prevent under exposure. An under exposed will be very noisy and detail will be poor. I frequently use ISO of 1000 to 1600 if I have to in order to keep the overall exposure correct and enable a faster shutter speed. Read and learn to use the histogram, find out what it means to push the exposure to the right without blowing out the highlights. The aperture controls depth of field and in most cases you want to be f/5.6 or higher, otherwise a good part of your bird will be out of focus. Point your camera at the perch, set the shutter speed at 1/500 sec, set the aperture at f/7.1, adjust the ISO so the meter reads zero on your camera. Now take a picture of the perch. Is it sharp and well exposed? Look at the histogram and make sure there is no data pushed against the left side (ie under exposed). If you need to, adjust the f-stop or ISO a little more to get the exposure right. I like to use the center autofocus point only on my camera for this type of shooting. I also like AI Servo mode so the camera stays focused on a moving object when I keep the shutter pressed halfway. Take a bunch of test s of the perch until you have the exposure adjusted. As the light changes you will have keep adjusting over time. If you do not like manual mode, it is certainly fine use aperture priority or shutter priority mode. I use manual mode and I find it easy to adjust on the fly. I try to expose for the bird and not the background. When a bird perches for you try to make sure the focus point is on the birds head or eye. The will look much better if the eye is sharp and well-focused. Also take into consideration the pose and head angle of the bird, its best if the head is parallel to the camera or angled slightly toward you. This will make the best . When you see what you like, start shooting, if possible take a lot of s – but I dont think the “machine gun” approach usually works too well. You will have some birds that are very skittish and some that will let you shoot all you want. Sometimes its best to let them come and go a few times before you start shooting so they arent permanently frightened away. I have found that birds will react more to motion than they do sound so avoid sudden fast moves as many times they can see that even inside the blind. Of course keep the opening in the blind as small as possible to just let the lens protrude. When theres a break in the action you can adjust exposure, review your s and consider if you need to move the perch or the blind slightly to improve the light or the background. Watch the sun angle and keep it mostly behind you. If your s arent sharp try increasing ISO or lowering the f-stop slightly so you use more shutter speed. Like maybe 1/1000 sec. or faster if possible. Take some more test shots of the perch and check the histogram. I have noticed birds are most active in the morning especially the first 2 hours after sunrise but there can periods of activity on and off all day. In colder weather birds feed more steadily. The best light is when the sun is low in the sky morning and evening. Very bright cloudless days when the sun is high in the sky are bad, the s have strong shadows and are usually too contrasty. Soft over cast days can produce nice s all day. An external flash and better beamer can really help on days like this. Use your imagination, change the perches frequently so all your s dont look the same. You can have more than one perch set up simultaneously. These are the techniques I have learned and taught myself. I really enjoy the challenge of trying to make the birds pose where I want them and challenge of using proper camera techniques to create sharp, well exposed s with pleasing backgrounds and with somewhat artistic composition. I know you can do the same. I am not a pro photographer and you may find many other opinions or techniques that are different from mine. Keep in mind I am self-taught and in photography there are no rules “set in stone”. If you start doing setups, you will learn your own techniques and develop your own style. I hope this information has been helpful as a starting point. Joel Eade
A blind is also an integral part of this process. Although you can shoot from your home through an open window, you are unable to adjust your angle, and it is difficult to obtain good lighting for the subject. I use the Doghouse blind by Ameristep, a pop-up blind designed for deer hunting. For less than $100, a variety of these are available. I made a five-foot-square frame out of one-inch PVC pipe, and I used wire ties to fasten the blind’s base to the frame. This secures the blind, but it can still be easily moved throughout the yard. Keep in mind that you want the sun to remain behind you, so it helps to move the blinds. To ensure that the blind fits as tightly around your lens as possible, you should look for one with a window size adjustment feature. This prevents birds from seeing movement inside. In my experience, sudden, fast movements tend to spook birds more than sounds. An old lawn chair will do nicely as a chair inside the blind.
by Joel Eade 1. In order to create detailed, realistic-looking shots, you can use food, water, sound, or other attractants to get birds to perch or fly close to your camera. Of course, I didn’t come up with the concept, and there are plenty of resources for this on the web and in books. This post is essentially a compilation of advice, concepts, and methods that I have picked up over the roughly five years that I have been reading and working at this. If you’re already interested in digital photography, setting up backyard scenes can be done quickly and affordably. All you need is some very basic equipment and a willingness to learn and experiment, along with some perseverance. It’s a creative way to make amazing birds at home. 2. What do I need to start with? To draw birds to your setup, you’ll need a few basic items. This typically means bird feeders. Many feeders are available, but simplicity and affordability are what I suggest. I use a few suet cages and a platform feeder that is supported by an inexpensive plastic Christmas tree holder and mounted to an old 4X4 post that is about 4 feet tall. Moreover, a water feature like a bird bath is beneficial. Many species are drawn to a small fountain that gurgles, especially in the winter when the nearby water sources are frozen. You should base your food selection on the types of birds that inhabit your area and their potential preferences. Search the internet if you do not know this information. I use corn, suet cakes (usually flavored with peanut butter), sunflower, safflower, and thistle seeds. Another fruit and jelly combination that works well to draw orioles is Although mealworms are costly, they are a well-liked attractant for blue birds and other species.